Linotype Machine
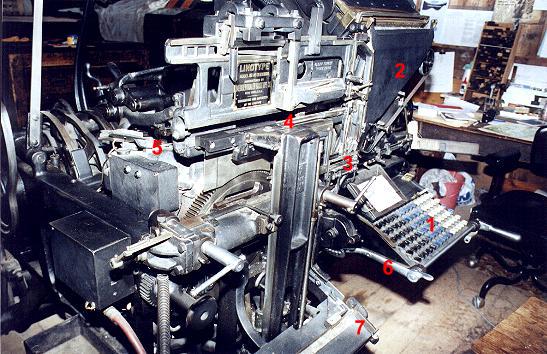 |
The above Linotype Machine was manufactured in the early 1900's. Its working parts are so meticulous, that the machine was invented and built by watchmakers. This precision machine has to be seen to be believed. This machine still works with precision nearly 100 years after it was made, a real testament to its manufacturer.
The Basic Operation of this Linotype Machine.
As mentioned on the previous page the objective of this machine is to make a metalic " line of type" known as a slug. This slug will be a series of letters and numbers, which could be words, sentences, street addresses or anything associated with the printing industry.
Stage 1
The machine operator's first job is to select the words or sentences he needs.
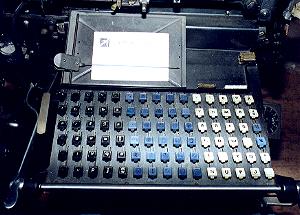 |
In the photo above the operator has a keyboard. Above the keyboard is a "dish" where the operator can attach a piece of paper so that he can read the words or sentences he has to transform into solid metal blocks or slugs. You can see he could adjust the line reader up and down.
The keyboard allows the operator to have three items. One is all alphabetical letters in CAPITALS, the white keys on the right. Second are all the alphabetical letters in lower case in seven point size, the black keys on the left. Thirdly there are spaces and punctuation, the blue keys in the middle.
Stage 2
The linotype machine stores all the letters and numbers in a storage/ retrieval device above the keyboard.
Note
These letters etc., are to be used to make a metal block with a specific word or words on the block. For the rest of the page let us assume the printer is going to use the words, " Chiltern Bakery now open Sundays! " which will be featured on the back page of a four page weekly newspaper.
The actual letters are really mini moulds onto which will be poured liquid or molten metal, lead and tin, or pewter, at a temperature of around 300 centigrade. The molten metal will be pumped into a small rectangular space where these "letter moulds" will form the "front wall" and trap the molten metal until it cools and solidifies into these letters or words, forming the rectangular slug, or line of type.
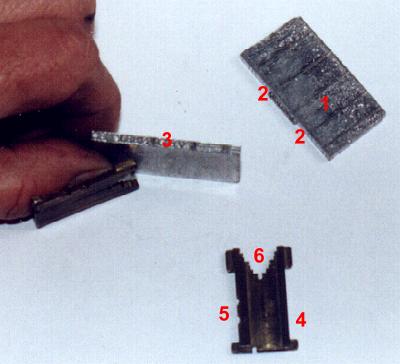 |
In the photo above is a slug or "line of type" laying down (1 ), and the raised metal letters are between the two letter 2s. When the slug is held up you can see the letters ( 3 ).
Item number 4 is one of the mini letter moulds. When the operator presses the keyboard for the small letter n, this item will fall down the chute. Looking at the left hand side of this mini mould ( 5 ) you can see two indentations. For lower case letters, the mini moulds may be set in two positions, one is normal lettering, the other is bold lettering.
This allows the Newspaper three types of print, Capital, lower case and bold.
So the metal is poured and forced onto one of these indentations, which will form the letter n.
When there are 33 letters and spaces in a line, the liquid metal will be forced into the 29 letters and the 4 spaces will be at the "wall " level, which will result in a metal block being formed spelling :-
CHILTERN BAKERY now open SUNDAYS!
or if moulded in the bold position
CHILTERN BAKERY now open SUNDAYS!
Note
On the above photo at position 6 there are many indentations to the letter mould, such as on a key. These are the coding to inform the machine where to return the letter mould at the end of the session.
 |
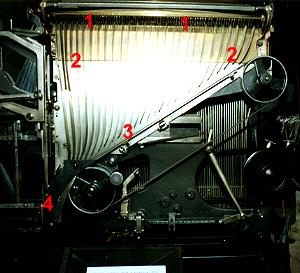 |
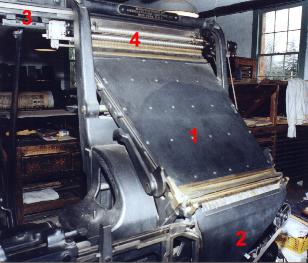
In the picture above left you can see the storage area of the mini moulds ( 1 ), and the chute section of the mini moulds ( 2 ).
Also on this picture is the collection or return point of the used moulds ( 3 ), and the area where the moulds are returned to their exact alphabetical storage position ( 4 ). ( Discussed later ).
By opening the cover of the chute area, picture above right, we can see the disbursement point when the keyboard is pressed ( 1 ), and the multiple chute area where the mini mould letter falls down ( 2 ) and falls onto a single chute ( 3 ) and comes to rest in the first work station ( 4 ), which is just to the left of the keyboard.
On the main picture at the top of the page, if you look again you will see the keyboard ( 1 ), the chute ( 2 ), and the first workstation ( 3 ).
So stage two is the pressing of the keyboard and obtaining a "line of letters" or a line of mini moulds, which is dropped automatically from the storage section, down the chutes and is collected at the assembly area, often referred to as the first elevator position.
Chiltern |
The Up Button takes you to the Home Page